Recently I've received emails and messages on facebook regarding my editing style, and general questions about the things that I do photography wise. Well, I don't mind helping anyone and in fact really love sharing information with people. I'm self-taught and everything I learned came from research and asking questions of other photogs, so I'm never stingy with information. In the spirit of that I've decided to start blogging about different techniques I've learned and how I've applied them. I think of it as paying it forward. Mind you I'm not a consistent blogger, but this year I'll strive to change that. I'm not a super technical person, so don't look for technical tips. I can tell you generally about F stops and shutter speeds, but since I don't retain information well, don't ask me why their relationship to each other is important. or why I used a certain shutter speed and F stop. LOL. My experience with photography is very tactile, so a lot of things I do are based on feeling. But, feel free to ask me anything regarding my method, and I'll certainly try to answer or direct you to where I got the answer. :) So, for my first, hopefully helpful, blog post regarding method I will explain my shoot '
Brawler' and how easy it is to change the color of an image with a gradient adjustment layer.
Not only easy but quick, because let's face it, I ain't got the patience for a lengthy tutorial. Note: There are multiple ways to do anything in Photoshop, I'm only sharing the way I do things.
So last year make-up artist Andie Sleeman and I got together with model Annelise Adams to do an edgy beauty shoot. I wanted to show a street fighter, a brawler, a beautiful woman who was not afraid to fight. I wanted to show her beauty through the bruises. It was published in
Ellements Magazine. You can see the entire editorial
here.
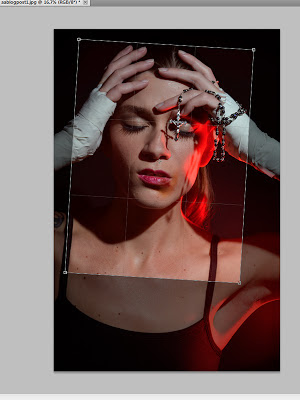
So here is the image I started with. This is with no edits. I used a
monolight with a filter to get that red light in the corner of the
image. The image isn't 'exposed' technically correctly, but was exposed for the lighting that I wanted.
The first thing I did was crop and rotate the image to bring the focus closer in on her face.
I've read a ton of tutorials and Photoshop tips that tell you the
best or easier way to edit is by using adjustment layers. They allow you to
see all the changes on your image without actually touching your image
layer. You can erase and adjust them at your leisure which is awesome.
So if you adjusted the brightness and it looks crazy, you can go back
and change it. I use these a lot because they allow you to stack changes
on your image separately and independent of each other.
Anywho, for this particular shoot, I
wanted to make the image a little more dramatic. I thought the color would
add a harder edge to these image. So I added a gradient layer.
You can find it in either of the places I circled.
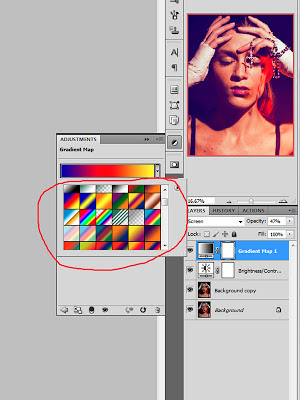
You can choose any of the colors in your gradients, depending on what look you want.
Once you have your color, then adjust the layer mode to what best fits the
look you want. In this particular one I chose screen and turned the
opacity down to keep the color from overpowering the image. Again, all
personal choices. Depends on how you want your image to look.
Note: Changing the layer mode is a good way to change the look of your gradient while keeping the same colors.
As you can see, the color changed drastically. In my opinion immediately it changed the mood of the image.
So, after the color is changed. This is the best time to do any skin edits that you're going to do. I usually edit skin after I've chosen the color my image will be. Sometimes when you're cloning and healing the perfect matches that you accomplished with the skin one color will show up differently when you make universal color changes to the picture.
Once the color was done I fixed up the skin, made other adjustments and here is the finished image. (
I didn't go over all the other edits done to the image as this was on how easy your image could be changed with a simple gradient adjustment layer.)


No comments:
Post a Comment